
Hello My Stampin Friends!!!
The temperature is a blistering 100 degrees outside!
Summer is finally here and you can smell the BBQ's blazing and laughter in the air as all
the neighborhood kids are finally out of school!
Seeing as it is nearing the end of June temperatures are peaking
it reminded me of an upcoming Holiday!
4th of July
So since it was time for another Techn{ink} Tuesday
I thought I'd incorporate the theme with the Techn{ink} I have today.
This Techn{ink} might be referred to some by different names but I call it the
Triple Layer Stamping Techn{ink}
Here are step by step instructions:


Lastly, using the Snail Adhesive (#104332) again, liberally, I adhered my
Midnight Muse Twine behind the First and Second layer, tying in a knot.
And finally attaching to the last layer. (See Left)
I found a perfect Stamp to finalize my card and stamped the image in
Midnight Muse ink onto Whisper White (#100730)
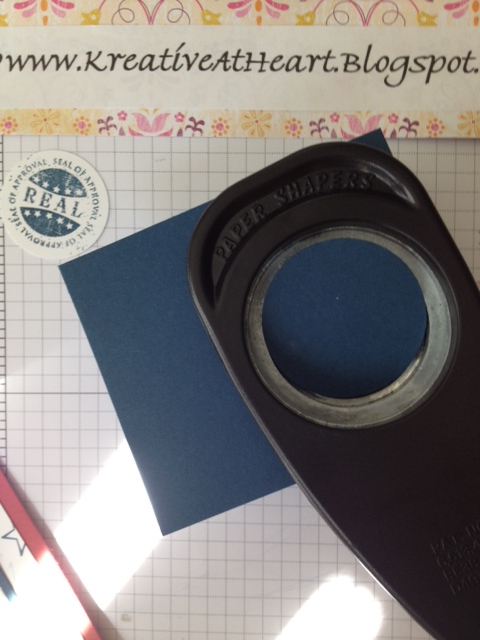
Using my Stampin Up circle punches
(because all SU! punches coordinate with each and every stamp set - For quick and easy building)
I punched a 1 3/4" circle (#119850) in Midnight Muse (#126843), then a 1 3/8" circle (#119860) in Red Riding Hood (#111348) and my final stamped image in 1 1/4" circle (#119861)
I attached all three layers together with my Snail Adhesive(#104332)
and add a dimensional (#104430) to adhere circle to the card

Here is our completed image!!
It was SO MUCH FUN!! You will see I even
added a few colorful brads at the top left corner!

Here are step by step instructions:

First you will need a clean piece of Cardstock, your Classic Ink and Cardstock.
I began with Whisper White Cardstock (#100730) and labeled each with their dimensions, since you probably can barely see (I used pencil)
the dimensions should be:
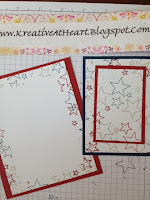
First layer cut to 2"x3 1/4", Second layer cut to 3"x4 1/4" and the Last layer cut to 4" x 5 1/4"


Now cut your Cardstock down to matting dimensions for each layer.
I chose Red Riding Hood (#111348) and Midnight Muse (#126843).
First layer measures 2 1/4" x 3 1/2", Second layer is 3 1/4" x 4 1/2" and the Last layer is 8 1/2" x 5 1/2" (Yes that is correct ... 8 1/2". This layer will be your card base so fold it in half to create a final dimension of 4 1/2" x 5 1/2"
Now set this aside.


Bringing back your Whisper White Cardstock (#100730),
place a small sticky strip with your Snail Adhesive (#104332) and touch it enough to lessen the stickiness. You will layer each piece together (See on Right) accordingly but will want to be able to detach each layer after the next portion of this Techn{ink}
(I hope that makes sense)


Now using your ink and your imaging stamp, begining stamping in the middle of your Triple Layers of your Whisper White Cardstock (#100730),
I first inked my images using Crumb Cake (#126975), then Midnight Muse (#126860) and finished with Red Riding Hood (#126968).


When you pull the three layers apart (See Image on Left) this is how it will look.
Even using this Techn{ink} would be fun to use the layers separate as a background to a photo or journaling. ** Lightbulb**
NOTE: Be sure to not turn your images or layers clockwise or out of order or else each layer wont match up identically with its coordinating layer.
You will want it to appear the layers were never separated.
Attach the first and second layer to the appropriate Cardstock,
but Don't attach the Third layer just yet!


Were almost finished, before attaching the Third layer, I wanted to add some Bakers Twine. Here is another Techn{ink} I learned from my wonderful Upline, Wendy Cranford! Here I cut 28" of my Whisper White Bakers Twine (#124262),
my Midnight Muse ink (#126860) and a Sponge Dobber (#101610).
I wanted to color my Whisper White Bakers Twine (#124262) to match my Midnight Muse Cardstock and ink.
*How you ask?? Simply take your Whisper White Bakers Twine (#124262)and
Dobber (#101610) , softly pressing into the ink pad and Taadaa!
You now have Customized Twine to coordinate with your project!
How fabulous is THAT!?!

Lastly, using the Snail Adhesive (#104332) again, liberally, I adhered my
Midnight Muse Twine behind the First and Second layer, tying in a knot.
And finally attaching to the last layer. (See Left)
I found a perfect Stamp to finalize my card and stamped the image in
Midnight Muse ink onto Whisper White (#100730)
Using my Stampin Up circle punches
(because all SU! punches coordinate with each and every stamp set - For quick and easy building)
I punched a 1 3/4" circle (#119850) in Midnight Muse (#126843), then a 1 3/8" circle (#119860) in Red Riding Hood (#111348) and my final stamped image in 1 1/4" circle (#119861)
I attached all three layers together with my Snail Adhesive(#104332)
and add a dimensional (#104430) to adhere circle to the card

Here is our completed image!!
It was SO MUCH FUN!! You will see I even
added a few colorful brads at the top left corner!

Here is the inside of the card too.
Cardstock: Whisper White Cardstock #100730, Red Riding Hood #111348, and Midnight Muse #126843.
Ink: Crumb Cake #126975, Midnight Muse #126860, and
Red Riding Hood #126968.
Tools Used: 1 3/4" circle punch #119850, 1 3/8" circle punch #119860,1 1/4" circle punch #119861, Whisper White Bakers Twine #124262,
Snail Adhesive #104332 and dimensionals #104430.
Very Nice CArd! Really like the colors you used... Great job
ReplyDeleteGreat card. Love the stamping and layout.
ReplyDeleteI like this Nikki!! Great for a Guy card or 4th of July!
ReplyDeleteThank you everyone for your kind comments!
ReplyDeleteI love being able to share these fun tidbits with all of you!
Big Hugs!!
Really a wonderful card - very creative!!!! Thanks for your tips!
ReplyDeleteThank you Carol, I'm so glad u stopped by <3
ReplyDelete